Friday, 27 March 2015

My love affair.....with Peony&Sage


If you have a passion for sewing,textiles or interiors you will understand how very exciting it is when you discover a beautiful brand of stunning fabrics that you know you will love for EVER !


Peony & Sage is the inspiration from the very talented Kimberley Bell who designs these beautiful vintage inspired fabrics.


My first P&S purchase was one metre of this gorgeous Gustavian Grey hare fabric. I teamed it with brown leather to make this cute luggage set.....and so the obsession began !           


It is difficult to explain the pure pleasure of receiving a P&S fabric parcel, but put it this way, for me its as good as buying shoes and handbags - yes that good !

When I create something in these stunning linens I put all of my heart and soul into it, which can make it very difficult to part with - not an ideal business plan !

This is one of my favourite designs- Mr Hare in Fudge.
The attention to detail is esquisic and the quality of the fabric is outstanding.


I recently gave my bedroom a bit of refurb, so I knew exactly where to turn for inspiration. I can literally spend hours on the P&S 
website swooning over fabrics and wallpapers.

I fell in love with these coastal fabrics.
I used  Seagulls in Storm to make cushions and lampshades.
For the footstool I used Breton stripe and used Slate Gray stonewashed linen to upholster this chair.


And now for the exciting bit ....

I have designed and made many drawstring bags using P&S fabrics. This new design has a leather panel which can be used as pockets. 

Here is your chance to win one of my Peony&Sage leather bags - to enter you will need to either follow my blog or leave a comment on ANY blog post. The winner will be drawn on Friday 3rd April, and will be able to choose their preferred design from the two below. Good luck x


Take a look  at Kimberley's gorgeous fabrics,wallpapers and shop http://www.peonyandsage.com


Have a great Weekend folks x


Friday, 20 March 2015

One short day in the Emerald City


You could say its the best of both worlds. A seaside town to live in and a large, vibrant city just a stones throw away - Bristol.


We frequently make the 30 minute jaunt to take advantage of the large selection of restaurants,theatres,museums and most importantly shops.


A trip to the theatre was the visit on this occasion to see one of my favourite musicals, Wicked, which is currently on tour.


The Bristol Hippodrome is in the heart of the city next to the harbour side which sites many restaurants and bars. The main shopping area is only a few minutes walk away but just around the corner is one of my favourite places to shop - Park street. An invigorating climb through a wonderfully independent retail haven of coffee houses, boutiques, restaurants and a sprinkling of a few familiar high street shops. 


One of my favourite shops is the boot room. Selling a unique collection of shoes, gift ware,jewellery as well as a vintage section. I have my eye on this:


So after a peruse around the shops, we had time for a bite to eat. Always truly spoilt for choice - trying to come to a common consensus is always  tricky! (especially when it comes to food) Gourmet Burger had the winning vote and what a good choice it was. This was my first visit to GBK on Park street and it didn't disappoint.
We all indulged in our chosen burgers which were delicious!!
Though the piece de resistance had to be the sweet potato and skinny fries(I'm salivating now just thinking of them). 10/10.


So with our tummies nicely full we took to our seats. I have watched this show four times in London  so knew exactly what to expect . It is the prequel to The Wizard of Oz - with an imaginative storyline,fantastic songs and a heartwarming love story. 

Going to the theatre is such a treat, and as a family we try to do this as often as we can, though the cost can be hard to justify !
Taking my daughters from any early age has also given them a passion for musical theatre and performing.

This is a pic of my eldest daughter performing in Chitty Chitty Bang Bang on tour a few years ago.


I would love to know which is your favourite musical.

Have a great weekend 


Friday, 13 March 2015

She shall have a dishy


Today I am sharing how to make these fun clay dishes. They would make a lovely addition to your home or great as a personalised gift.


You will need:  White clay 
                                   A plastic bowl 
                Letter stamps 
                                  Tester emulsion pots of your chosen paint colour.

Links to the products I purchased are at the bottom of post. 


I purchased this clay from the works,I made about ten dishes from this size packet.


You first need to roll out your clay,I divided mine into four sections to make it more manageable and to avoid it drying out.


Put your bowl on the clay(the bowl I used was 13cm in diameter) and either push it down or cut around with a knife.If you are left with a bit of a messy edge, I suggest trimming with scissors and rubbing gently with your finger to smooth out.


You then need to select the wording for your dish.
When you are happy with the way your clay circle looks,gently push it down into your bowl. Leave to dry for approximately two days.


Now for the best bit .... 
As I may have mentioned before,I am very impatient so after one and a half days of itching to get my paints out, I resorted to putting them on the log burner to dry faster - I do not advise this as they could crack.


As I am yearning for the spring,I chose a pallet of pastel shades.I left the area of wording free of paint for two reasons:
Giving more emphasise on the wording
The indentation of the wording can get clogged up with paint,looking messy.


Finally you can pop a layer of varnish on if you wish to give them a glossy finish.


I would love to see some pics if you have a go #mabelandmaymakes


Plastic letter stamps:http://www.ebay.co.uk/sch/i.html?_sacat=0&_nkw=letter+stamp+cake&_frs=1

Clay:http://www.theworks.co.uk/p/clay/das-1kg-white-modelling-clay/8000144074105


Friday, 6 March 2015

February Favourites


Like many of you, I couldn't be happier to say good riddance to February and welcome March with open arms. Winter in the UK has been here for far too long and now I'm bored with it !!!

Before February is a distant memory, let me share with you some of my favourite purchases and discoveries I have made this month.


I have had a passion for all things copper for some time, so couldn't be happier to see so much copper adorning the shelves of our high street shops.


This gorgeous metal bowl has a matt black outer with a polished copper inner. It was such a steal at £12.99 available from Dunelm http://www.dunelm-mill.com/shop/global-luxury-home-decor-collection-533556


Also available are these cute T-light holders, that could also be used for trinkets.
These are only £3.49 - I'll have 10 thank you very much !


My next purchase was one of necessity due to a bit of a domestic disaster....
After recently giving my bedroom a refurb, I treated myself to some lovely bedlinen from The White Company. 
I adore this shop.... bedlinen, home wares and gorgeous fragrances.

So when I put my beloved bedlinen into the washer with a dirty red tea towel (unknown to me) you know the outcome is not going to be a good one. I tried a series of remedies to try and resolve the problem, however the end result was bottle green and went in the bin !!
After a very short mourning period,I chose the new design Somerton which has a fine grey stripe. It feels gorgeous next to the skin,smooth and crisp.


Also from the The White Company is another of my Feb favourites - The Seychelles room spray.
This is one of my favourite fragrances from this company, containing bergamot, orange, vanilla and almond. I use this mostly in my bedroom, more specifically on my bedlinen - yes a perfume for my bed! I give it a generous spritz when making my bed and can still smell it when when its time to get some Zzzz 


Now I am finding my feet in the world of blogging, I would like to say a BIG thank you to Angie from Artwork by Angie who gave me some great advice on how to start my blog x

Angie is an Illustrator, graphic & surface pattern designer. As well as being very talented, she is also a lovely lady.


This is one of Angie's Mothers Day cards, which I love !
 Go and check out her website and blog x


Angie also designed my logo and branding a few years ago.


Hope you have a great weekend - I hear rumours of warm sunshine !


Friday, 27 February 2015

It's a gift

Every week I am unbelievably grateful to receive this gift, it is a gift that my work colleagues envy, a gift that can not be bought... it is the gift of a day off. 


But what is it about a day off that makes it so incredibly sacred, when in fact my day off is probably my busiest day of the week - cleaning,running errands and hopefully a bit of mabel&may time, if I'm lucky. 

For me its a day when I'm in charge. I can selfishly decide, where to go, who to see and what to do. So whether I decide to spend  hours cleaning the oven (very rare) or a day at the spa (still rare but probably more frequent than the above) to be in total control of my day is a great motivation.


For me this day is also about preparation for Friday night and the weekend -  this is family time.... this is precious x


So on the subject of gifts, here is a piece I have been working on for a gorgeous family ...and yes its a gift .


Have a great weekend 


Saturday, 21 February 2015

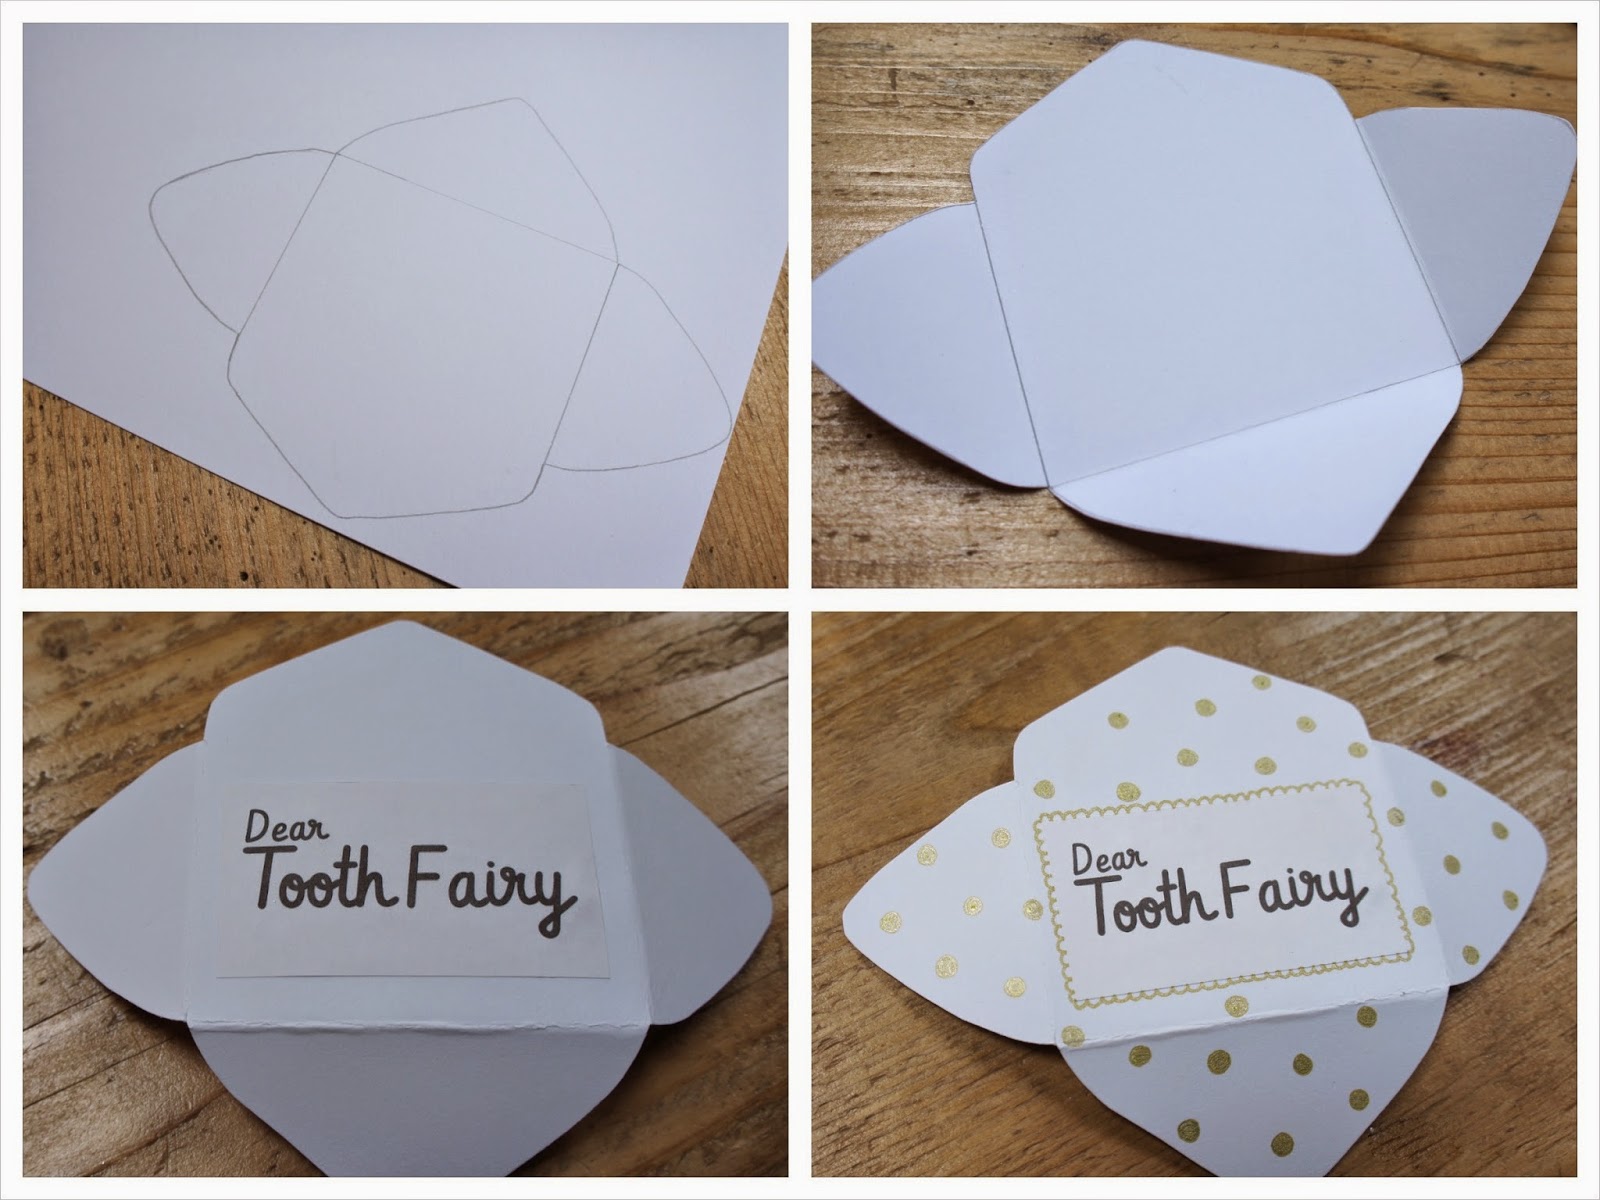
A visit from the Tooth Fairy


               For my first crafty tutorial I wanted a little project for everyone to have a go at!


You will need: A printer, to print out the template.
                        Card stock or paper.
                        Glue (I use a glue gun, I'm very impatient!)
                        Scissors.
                        Pens if you wish to decorate

First you will need to download this template to print.


You will need to cut out the template pieces and draw around them on to your chosen card or paper, then cut out.

I then scored my folding lines and glued on the address panel.
As I used plain stock card, I decided to decorate using a gold metallic pen, drawing on sparkly gold dots to match my gold spandangly fairy wings.


At this point you can either seal the back of your envelope(the bottom and side panels) and  glue the wings on the back or if you are able to use a craft knife, score along each side of the envelope so the wings can be pushed in,glued and therefore concealed. 


Voila !!! So this is the basic design, I would love to see your own versions with different papers and personalisation. 
If you would like to share please use the #mabelandmaymakes on social media x


The inspiration behind this tutorial came from my original designs for Fabric Tooth Fairy envelopes.


Hello and Welcome

For those of you who are already well acquainted with Mabel&May, please bear with, while I introduce myself to the world of blogging.

 I started Mabel&May not only to channel my thirst for creativity but to indulge in something that gives me enormous pleasure. Over the years I have been able to successfully promote and sell my wares using social media platforms and have been very grateful to a large following of loyal and supportive customers.

 It is with these people in mind, and the desire to connect with new like minded folk, that I decided to enrol myself in to the world of blogging. As a blogger I will endeavour to post once a week with a broad spectrum of topics and to once a month include a crafty tutorial. 

 If you are new to Mabel&May and deciding whether to stick around, here are a few little nuggets of my work.


 Cotton clouds - I have recently altered my original design to be able to indulge in my obsession with copper(added copper wire LEDs). I have one of these hanging over my desk, though I think its most popular destination has been Nursery's and children's bedrooms -  Super cute !
                            
On my to-do list is to make a huge pile of cloud cushions in pretty pastels.


You will probably see a common theme in lots of my makes....a love for hares and bunnies !


Thanks for popping by, I would love to hear what kind of tutorials you would like to see.